Woodburning, or pyrography, seems to be making a big come back lately but why is it when I see something about wood burning there is always something said about it being for teenage boys or men? I mean, woodburning is for women too! In fact, I rather love woodburning. And I’m a middle aged woman.
Anyway.
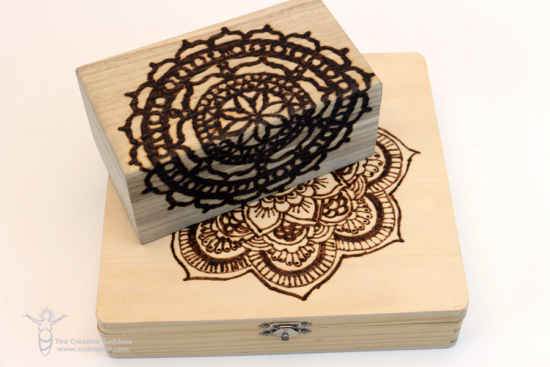
I’ve been in the process of cleaning out my storage area in the studio and came across several wood boxes so I broke out my woodburning tools and did some practicing. The box on the top is my first try and the box on the bottom my second. I did some practicing on random scraps of wood too and here are some things I thought you might like to know about basic woodburning.
Woodburning Success Tips
- Soft woods with minimal grain, such as pine, are easier to burn than hardwoods.
- As you work, use 320-grit sandpaper or a damp paper towel to lightly brush away any residue or buildup from the tip of the woodburning tool. If you do this while the tip is hot, avoid holding the sandpaper in your hands or touching the paper more than a second.
- Use a pair of pliers to remove hot tips safely and easily. Place hot tips in a small glass or metal dish to cool. Even though cool tips can be handled safely, use pliers to insert them into the barrel of a hot tool. They heat up quickly!
- Let the woodburning tool do the work – don’t force it. Too much pressure can bend hot tips.
- Pull the woodburning tool rather than push it and don’t try to burn too deeply. A smooth drawing motion, just like with a pencil, is best. You can always go back over it to make the burn deeper or wider.
- Try out new steps and techniques on a sample board cut from the same material you’re burning.
- Practice with different tips to see how they burn and what types of lines and patterns they create.
- It goes without saying but… Keep the wood burning tool out of the reach of children and away from flammable materials, including flammable liquids. If you’ve got little people around be sure that if there is any chance the tool may be even a little warm put it up out of reach.
- If the woodburning tool starts to fall, quickly move out of the way and let it fall. Don’t go with your gut reaction which will be to grab it before it hits the floor.
- If you are going to do quite a bit of wood burning you may want to protect the floor around your table, especially if it is carpeted, just in case the tool should fall.
- If you’re getting a lot of smoke, the pen is too hot. Try turning down the heat for smoother, smokeless burning.
- If you are sensitive you may want to have a fan blowing any fumes or smoke away from you.
- Be mindful – the tip gets extremely hot. When the tool is plugged in, always be mindful of where the hot metal end is. Be sure it isn’t touching anything and always have it resting on the metal stand when not in use.
- Tape the cord to the table you are working so that the tool more readily stays in the metal holder. This will help it to keep from rolling off and burning you.
- You get what you pay for. I have purchased super cheap woodburning tools where the tips literally melted. This one is my favorite (affiliate) Walnut Hollow Creative Versa Tool.
- Before you leave the work area do an “idiot check”. Make sure the tool is cool, unplugged, and the cord isn’t dangling. Make sure all tips are up out of reach as well.
Creating Woodburned Designs
Supplies:
- Carbon paper
- Tape
- Sandpaper and/or Wet paper towel
- Design or artwork
A woodburning tool is a very simple tool. It’s a pen-like device with a metal end through which heat is transferred to a removable tip. All but the cheapest models are variable temperature tools. With any kit, you’ll get 4-7 different tips for various methods of burning: straight lines, rounded lines, shading, etc. You’ll also get a metal safety stand for the pen so it’s never just sitting on a table or workbench.
The first thing you need to do, before working on any project, is to simply get familiar with the tool. Get a piece of scrap wood, plug in the woodburning tool and let it heat up for about 5 minutes, practice “drawing” on the wood with the various tips just like you would with a pencil. The key is to go slow and steady. Don’t try to burn too deep or too wide in the first pass. You can always go back and make a burn deeper, darker, or wider.
To transfer a design place transfer paper between the pattern on top and the wood below and tape in place. Trace the lines of the pattern with a pencil or ballpoint pen to create the design on the wood.
When you follow all of the safety tips woodburning can be a fun hobby or craft tool. I find it very relaxing.
Have you tried woodburning? How did you feel about it?


I wood burn on gourds and I love it! You can do so much. I started out with an inexpensive tool and then went to a more expensive one that is a variable heat and that you change the pens instead of just the tip. There are really only about three pens that I use all the time and then there are specialty pens for certain techniques. Gourds are much like wood and have different degrees of hardness to burn on. Yes, even after wood burning for several years, I’ve still been known to burn myself. Always use safety measures.
I tried wood burning years ago.. but I think I purchased the wrong type of instrument. I was very cheap back then… I love the idea of making design on boxes and boards. Want to make a wooden sign with our house number on it. Thanks for all the hints… Sounds like some of them were learned quite intimately! LOL